
Umbraco: From Bug to Fix with Nat
Contributing to Umbraco CMS Development
Umbraco is an open-source, editor friendly and powerful CMS based on .NET which powers more than 700000 websites.
As Umbraco Platinum Partners, we at ClerksWell proudly build and maintain a vast array of our clients’ websites using this versatile platform.
I love contributing to open-source projects, especially the ones which I use for my work.
I feel that it is a way of giving back to the community, through our suggestions or bug fixes, no matter how big or small.
You can also grow your knowledge by understanding how your favourite CMS (Umbraco) works under the hood and pick up some skills as well.
In the end, your contribution can help thousands of users.
In this walkthrough, I will give a small rundown of how I find an issue in the Umbraco CMS Github repository, work on it, and submit a Pull Request to fix it.
Let’s go to the issues section of the Umbraco-CMS Github repository.
The Umbraco team uses a community/up-for-grabs or good first issue label when they feel any member from the community can pick up any issue and work on it.
Visit this link and find an open issue which you feel you can work on.
Check to see if the issue has been assigned to anyone else, otherwise drop a message in the issue, asking the maintainers, whether you can work on it.
I have found a nice simple one, related to accessibility where the Save and Publish button is not highlighted when tabbed/focused on Firefox browsers.
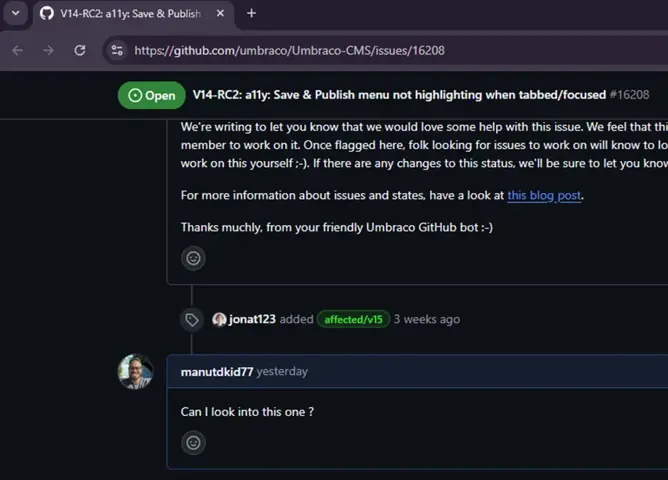
We at ClerksWell take accessibility very seriously, so this was a nice issue to pick up.
-
Ensure you have a GitHub account.
-
Visit the Umbraco-CMS repository and fork it by clicking on the Fork button.
What this does is that it creates a copy of the Umbraco-CMS in your GitHub account

Cloning the Umbraco-CMS repository -
After the fork creation is completed, clone the repository to your machine by clicking on the Code button and copying the clone url.

Copying the clone url of your forked repository. -
Open any command line tool of your choice on your machine, paste the clone url in it and execute it.

Cloning the forked repository on our machine
This will create a local copy of the forked repository on your machine.

The forked repository
Required Tooling:
· Visual Studio Code
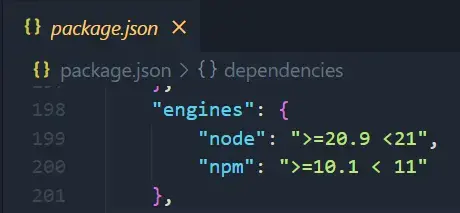
· Node.js version between 20.9 and 21
· npm version between 10.1 and 11
· Mozilla Firefox
I was able to find out the required node and npm version by checking the engines section in the package.json file
Note: For managing different versions of node.js, consider using nvm (Node Version Manager). It allows you to switch between different versions of node.js seamlessly, ensuring compatibility with your project.
We will work on the contrib branch as our issue is based on Umbraco 15 and the contrib branch points to the latest Umbraco version (the latest is 15 at the time of writing).
Note: If you are fixing a bug for another version of Umbraco, for example Umbraco 13, then switch to the branch named v13/contrib
-
Switch to the contrib branch using the git command
git checkout contrib
-
Create a new branch and name it after the issue number you are fixing, in our case lets call it temp-16208.
The git command will be
git checkout -b temp-16208
-
If you open up the Umbraco-CMS/src folder, you will notice there are many projects here.
Since our issue occurs in the Umbraco Backoffice and it is also a front end issue, the project we are interested in is the Umbraco.Web.UI.Client project.
This project is purely the front end code of the Umbraco backoffice and doesn’t depend on any .NET code to power it, as it has many mock services supplying mocked up data to build content.
We can change this so that it talks to an actual Umbraco backend, but let’s talk about that it another blog post 😊

The Umbraco.Web.UI.Client project among all the other projects -
Open this project in Visual Studio Code.
Once we have the project in Visual Studio Code, all we need to do is install the dependencies and run the project.
-
In the terminal, which appears in Visual Studio Code, run the following command to install the dependencies.
npm i
-
Then run npm run dev
-
After a few seconds, this command will give us a local url which we can pop into our browser

The npm run dev command executing and providing a URL to browse -
There you have it, our Umbraco backoffice is up and running with some mocked up data.

The Umbraco backoffice
All right, as the bug occurs on Mozilla Firefox, lets fire it up 😉
-
Take the url http://localhost:5173 from the terminal and load it up in Firefox.
-
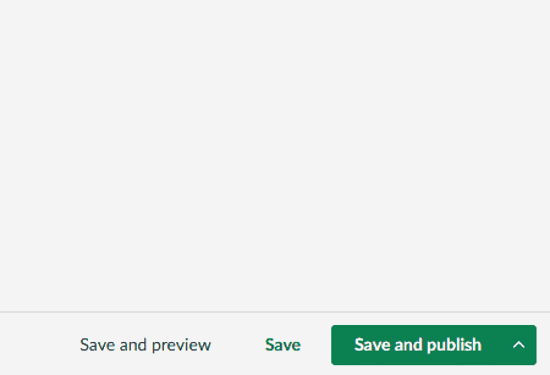
Select a content node to be published.
-
Open a content document (or any part of Umbraco with a Save and publish type menu).
-
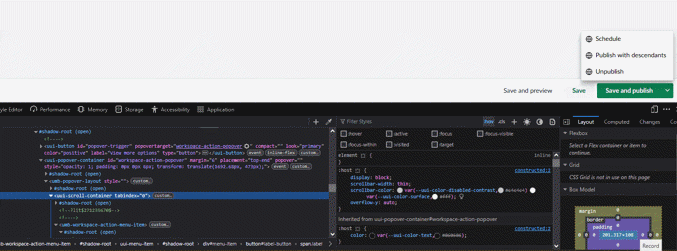
Tab into the secondary carat 🔽 menu, and press enter.
-
The focus is on the whole menu, but the menu is not highlighted:
Its time to open the Web Developer Tools from Firefox and inspect the html and css.
By digging around I found that the popover was using overflow:clip and was preventing the highlight from getting displayed.
All we needed to fix it was to set the overflow:visible and voila we have a working solution 😊
Now let’s go to Visual Studio, find the typescript component and place the fix there.
The file we are interested in is workspace-action-menu.element.ts
All I did was to give the popover element an id and assign the overflow:visible style to it:
#workspace-action-popover-layout {
      			overflow: visible;
    		}
Next, I tested our fix on Chrome, Safari and Edge to check that we haven't broken anything.
Everything looks good, so its now time to commit our code and submit it as a Pull Request.
-
Stage your change.
-
Commit it with a nice commit message.
-
Push the branch.
-
Go to your forked Umbraco-CMS repository on GitHub.
-
You will notice a small banner indicating that you have pushed a branch and its ready to be submitted as a Pull Request.

The banner informing us of recent pushes to the branch -
Click on Compare & pull request.
-
You will then be navigated to a page to submit the Pull Request.
-
Here please add a nice description, with some screenshots/gifs and also mention the bug which your pull request has fixed, in our case #16208

The Pull Request page -
Finally click on the Create pull request button.
-
Here is the link to my Pull Request.
-
That’s it, we are done, all we need to do is wait for someone from the Umbraco team to review our Pull Request.
I hope this walkthrough has helped you to understand the process involved in making a code related contribution to Umbraco.
If you need some help, always feel free to reach out to me or anyone from the Umbraco Community.
I would like to thank Paul Seal, my good friend and colleague for suggesting that I blog on this topic and to use the Screen To Gif tool for making nice gifs.
I would also like to thank my employers ClerksWell, for supporting and giving me this opportunity to write an article on our website.
All the best,
Below are links which I used to get started: